Create beautiful food photos in minutes. Here are expert food photography tips for Instagram to make CPG food products and recipes look delicious.
One of the most widely viewed and popularly growing subject matters being shared across Instagram is recipies and food photography. This trend of gastronomy followers and sharers is a product of an underground culture of food enthusiasts. That being said, more and more people are able to cook up awesomely delicious looking food in their own kitchen and share them for all to enjoy and recreate. If you have a recipe that you simply can not resist sharing, the following tips will help you to create delectably enticing photos that will make your nose tingle and stomach growl when looking at them.
Choosing The Right Recipe
This sounds easy, and it is. Start with cooking/sharing something that you love. If a recipe is near and dear to you, or speaks to that rumble of an appetite, then it is likely that others will love it too! Consider the time of the year and food trends that are out. Are people looking for comfort foods, or healthy/diet options? Catering to the ‘tastes’ of the season will help with user engagement. Here’s how we did it for client Bumble Bee Seafoods. The photo below not only shows yummy alternative ingredients using Bumble Bee® Tuna but highlights one of my favorite days of the week, Taco Tuesday!

Food Presentation AKA “Plating”
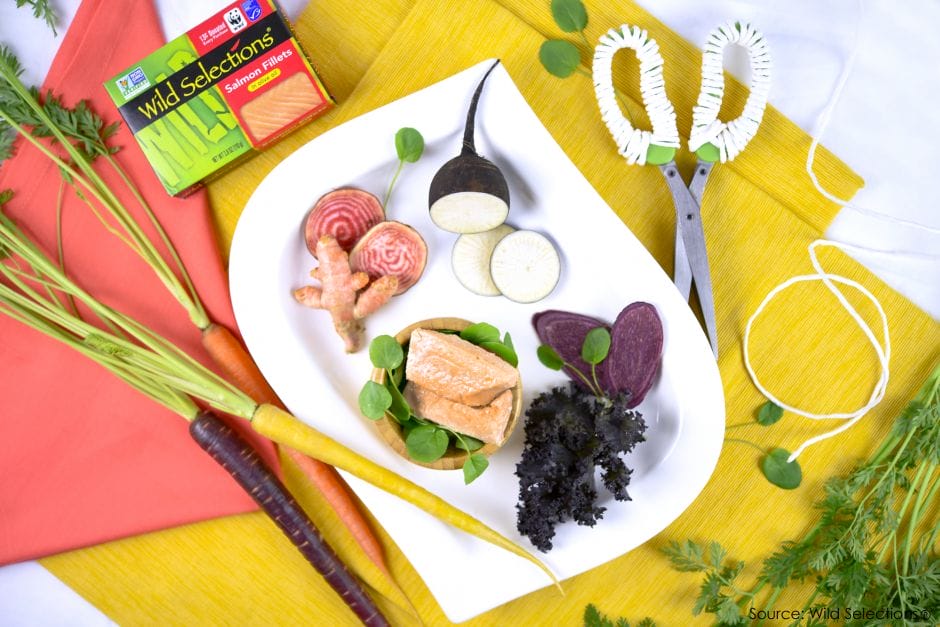
Even if you are not a foodie, you know that presentation is everything. Food not only tastes better when it looks pretty, it is scientifically proven that colors can affect your appetite (just ask all those fast food chains who have spent millions of dollars on the research). This boils down to our primal instincts to pick and eat things that are brightly colored and fresh looking. Always start by taking deconstructed ingredient photos and mid-process preparation photos. This helps you tell the whole story. When the recipe is ready to be plated, choosing complimentary dishware or surfaces can help to enhance the food and give it that palpability in a photograph. The photo shared below explores how one picture can tell a whole story with an interesting surface and deconstructed ingredients.

Food Lighting & Environment
Yes, presentation is everything – but so is lighting. Lighting can make or break a photo in the best and worst way. Choosing an environment which allows for floods of natural, diffused light are always best for food photography. This will help you to get the most accurate colors and will help with detail. Stay away from lighting which casts long dark shadows. Fluorescent and halogen lighting can be harsh and throw off your white balance, making more work for you in post production. Typically, shooting next to a large window with a soft white sheer curtain will offer the best lighting. Rich woods and stone textures offer beautiful contrast for many dishes, while a white tabletop helps to add a professional feel and brighter shot. Adding props like cutlery and linens can invoke that emotional connection between you and your viewers.

Angle & Focus Your Dish
There are three common angles that you will see most in food photography.
- Eye Level View: This shot allows for a full framed view of the dish but captures everything in the background so you will need to make sure that the whole shot is staged nicely and not too distracting. Using a shallow depth of field is best for keep the food in focus but the background blurred.
- 3/4 View: This shot is looking down at a 45 degree angle which crops out the background but gives the look of a long never-ending surface. This angle is great for macro (close-ups) and detailed shots. Feel free to play with framing the image so that it falls off the screen. Shallow depth of field works really well here too.
- Bird’s Eye View: This is an overhead shot generally letting the dish fill the frame entirely. Large depth of field helps everything be in focus, including the surface that the dish is on. This shot is particularly nice for showing off ingredients or a table setting.

Food Photo Equipment
I saved this for last because equipment can vary depending on your lighting. I have seen (and produced) some really nice photos simply with my iPhone. Using the filters and photo editing software that comes with your phone (or even on the Instagram app) you can get a great ‘off-the-cuff’ shot with good lighting. If you are not fortunate to have optimal lighting, you can always shoot outside, or invest in better equipment. What is nice about shooting from your phone is that it is convenient for posting immediately. For the best variety in your shots, your camera should have a setting for close-up/macro photography as well as the standard settings. If you are using a point and shoot, or a more advanced camera, you should learn basic post production editing and might want to invest in some photo editing programs. The image below was taken near a big window but also had 2 lightboxes on it for diffused lighting, was taken with a DSLR camera and had minor post production enhancements.

In the end, good food photography takes practice, practice, practice! Lighting can be your best friend and worst enemy, and having a creative eye will help tremendously. Always keep in mind your audience and what they want to see in food photos on Instagram. Most of all, have fun with it!
Find Stock Images of Cannabis Edibles
Meet Guest: Renee Mills

Renee is a graphic designer with Fandom Marketing. With over a decade of experience, she aspires to captivate brands and their followers through intuitive and cutting edge design. Renee has an advertising background with a focus on brand development and blends a mixed media skill-set with her passions for the philosophy and impact of quality design.

No Comments