
These days social media managers are expected to do it all and have a variety of skills. Customer service? Check. Online sales? Check. SEO? For sure. And graphic design? That too. Familiarizing yourself with a few of Photoshop’s basic features will help you to throw together more professional looking graphics. You can start by downloading this photoshop mac torrent and practice these five Photoshop basics to build upon your long list skills.
1. How-to scale and rotate a photo
I said “Photoshop basics,” and this one is about as basic as you can get. The “transform” command, allows you to scale your image (make larger or smaller) and rotate as needed. This applies to images and text. The main thing to remember with this command is, to maintain proper proportions, hold down the “shift” key. Otherwise your image may become long and stretched out. Utilize the keyboard shortcut for quickest application.
Keyboard shortcut: Command+T (Mac) or Cntrl+T (PC)

2. How-to hide a portion of a photo
Clipping Masks are the easiest way to hide an unwanted part of an image, without deleting or permanently changing how it looks. For example: below on the left I have a photo of Melonie on top of our Expert Series image. I want Melonie’s photo to be a square, but it’s currently a rectangle. Rather than delete part of that photo, I create a separate square shape (the actual shape I want her photo to be), put that layer under her photo and then do a Clipping Mask. This then shows just the part of her photo I want visible. I can then re-size her photo if needed, because I didn’t delete any part of it.
To do a clipping mask you can highlight your two layers (shape and photo) and go to Layer – Create Clipping Mask. Or, just position the photo on top of the shape in the layers palette and hold your mouse between the two layers and hold the alt key down. Once the mouse icon changes shape, click to create your mask.

3. Two tools that will beatify your photos
Photoshop’s tools are truly endless, but there are two that are especially helpful, especially if your graphics use actual photos.
Clone Stamp Tool
This tool allows you to replace a part of the image with a small screenshot from another area of a photo. For example: if a face had a slight blemish on it that you didn’t want there, you can in one-click, cover that blemish with clear skin. Choose the tool, then Alt-left click on the area you want to use as the replacement (in the sample below, that would be the sky), then (without holding any buttons down) click on the area you want to cover. Remember to change the size of your brush for proper coverage!

To get a video lesson, watch to this Clone Stamp tutorial.
Dodge/Burn
These tools are pretty straightforward. Dodge lightens any area of the photo and burn makes it darker. Like the Clone Stamp, you can change the size of your brush.

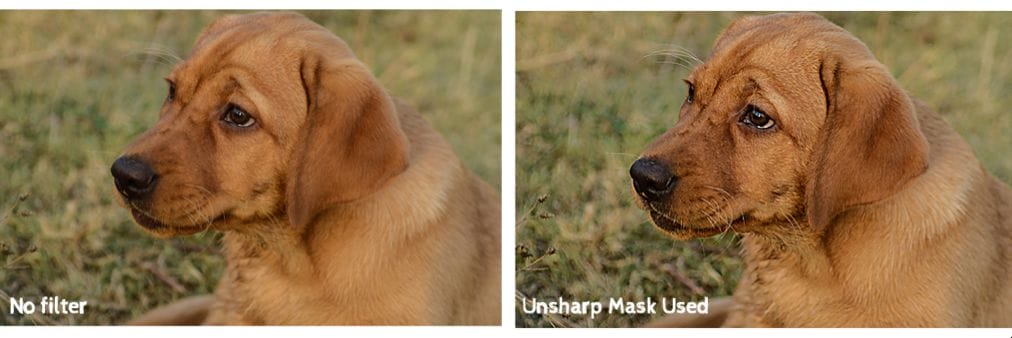
4. Use this filter for quick photo touch-ups
If you learn nothing else, learn how to use the Unsharp Mask filter – it automatically re-touches and sharpens your photo. Look under Filter – Sharpen – Unsharp Mask to find this option. There are a few sliders to play around with to adjust your image. For a full explanation on the settings, you can learn more but in general a great starting point is: Amount=85, Radius=1, Threshold=0-3. Play around but be careful and make sure you don’t over-sharpen your image.
5. Properly save files for Web use
Not necessarily a special feature, but definitely one of the important Photoshop basics that social media professionals should understand. When creating images for print, images are created at 300dpi (dots per inch) for high resolution (quality) printing. For the web, there’s no need for that high resolution. Computer screen resolution is 72dpi, so your images can be smaller (both in quality and file size). When you’re ready to save your file for the web, go to File and “Save for Web & Devices.” You’ll be presented with options including jpgs, gifs and more, but the result will be exactly what you need for online viewing. Large files will only slow things down for your viewers.
Get Creating With These Photoshop Basics
These five skills will help create fast, sharp images for social media without having to rely on a graphic designer. For expanded tutorials, don’t be afraid to look up how-to videos if you get stuck.


5 Comments
**SECOND POST** Hi, Ginger! You are so right that social media managers have to juggle a lot of balls (or spin plates, or whatever other metaphor you want to use)! One Photoshop alternative I use is to go straight to the “Image” menu which will take the user to the same commands as are on the “Edit” menu. Two solutions to the same issue…FWIW. BTW–the first time I replied, the post just disappeared, so I thought I’d try again!
Great post for doing some Photoshop magic, I sure can use the help. 😉
Perfect. I shared this with my fans!
These tips will help me especially to design new creations and styles to my social sites .I was trying to learn how to do some of the design stuff for myself.I am taking help from LearnPhotoEditing.net.Can you suggest me any of the other sites like this website?
[…] Anderson, G. (2014, March 24). Five Photoshop Basics Every Social Media Manager Must Learn. Retrieved from https://brandswithfansblog.fandommarketing.com/five-photoshop-basics-every-social-media-manager-must-… […]